How to Make Watercolor Paper Earrings
The construction of the water color paper earring needs 140lb watercolor paper, short length of 18 gauge wire, Elmer’s glue all, crazy glue, watercolor paints, 2 ear wires, 2 eye pins and clear gloss minwax ploycrylic varnish. The tools needed are X- Acto knife, self-healing cutting board, half round bastard cut file, 120 grit sandpaper, 600 grit sandpaper and watercolor paintbrushes.
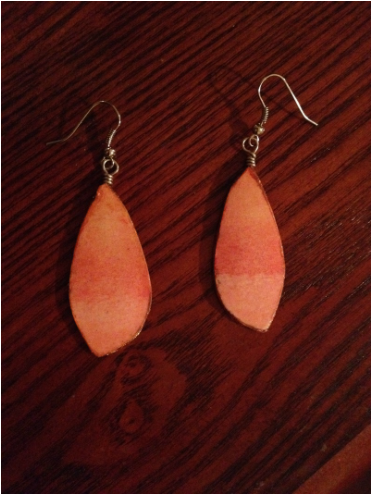
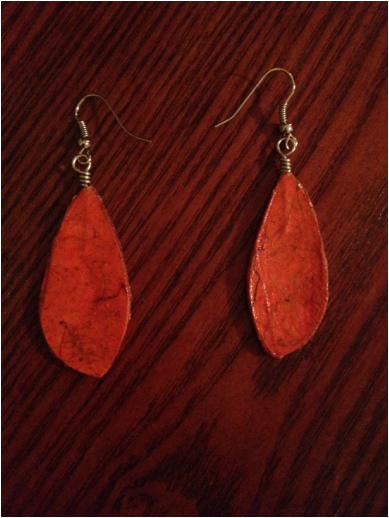
To start off, draw a two- inch earring with a desired shaped of your choice. After, draw in a channel onto the drawn image to take into account the eye pin. Next cut out the drawing using the cutting board and Acto knife. Use the cut out of the earring to trace an additional 5 more pieces to give a total of 6 earring cutouts and on two of the cutouts cutout the eye pin channels. Next, glue the pieces together in the order of one plain cutout, channel cutout and lastly the plain cutout on top. After gluing the channel cutout, place a wire in the wire cutout and glue the remaining plain cutout piece on top. Use a paper towel to sandwich the glued pieces together and to make sure the pieces remained glued. In the sandwiched paper towel, use a round object to develop a curve surface for the earring. Next glue together the other cutouts for the following earring following the same steps. After gluing, do the curvature with the opposite side of the earring. After gluing, prepare the watercolor paper. Using splattering techniques, let the watercolors flow and without blending the colors with the paintbrush. After the watercolors dry, cut out the pieces. Next, file down the glued pieces and clean off any excess of paper with the sand paper and filer. After apply glue onto the watercolor color paper and place it onto the respective earring cutouts and use the sandwich method to have the watercolor paper conform to the shape of the earring. Lastly, burnish the top layer with a wooden paintbrush to smooth out the layer. Next on both pieces, glue banana paper on the back of the earrings and allow both pieces to dry for about an hour. After drying, using the half round file, scrape off any excess edges of watercolor and banana paper on both earrings. Next remove the wires in both earrings using a pliers and then watercolor the edges of both earrings. Lastly, varnish the earrings and buff between the coats. The next steps involve making the eye pin for both of the earrings. Cut two-inch lengths of wire and using the round nose pliers, hold the wire at ½ inch from the wire. At the short end, bend a 45 angle, and the take the long end and bend it around the tip of the round nose wires. Holding the loop with the pliers, wrap the long wire around the straight length about 3 times. After making the eye pins, crazy glue both of them into the slots.
To start off, draw a two- inch earring with a desired shaped of your choice. After, draw in a channel onto the drawn image to take into account the eye pin. Next cut out the drawing using the cutting board and Acto knife. Use the cut out of the earring to trace an additional 5 more pieces to give a total of 6 earring cutouts and on two of the cutouts cutout the eye pin channels. Next, glue the pieces together in the order of one plain cutout, channel cutout and lastly the plain cutout on top. After gluing the channel cutout, place a wire in the wire cutout and glue the remaining plain cutout piece on top. Use a paper towel to sandwich the glued pieces together and to make sure the pieces remained glued. In the sandwiched paper towel, use a round object to develop a curve surface for the earring. Next glue together the other cutouts for the following earring following the same steps. After gluing, do the curvature with the opposite side of the earring. After gluing, prepare the watercolor paper. Using splattering techniques, let the watercolors flow and without blending the colors with the paintbrush. After the watercolors dry, cut out the pieces. Next, file down the glued pieces and clean off any excess of paper with the sand paper and filer. After apply glue onto the watercolor color paper and place it onto the respective earring cutouts and use the sandwich method to have the watercolor paper conform to the shape of the earring. Lastly, burnish the top layer with a wooden paintbrush to smooth out the layer. Next on both pieces, glue banana paper on the back of the earrings and allow both pieces to dry for about an hour. After drying, using the half round file, scrape off any excess edges of watercolor and banana paper on both earrings. Next remove the wires in both earrings using a pliers and then watercolor the edges of both earrings. Lastly, varnish the earrings and buff between the coats. The next steps involve making the eye pin for both of the earrings. Cut two-inch lengths of wire and using the round nose pliers, hold the wire at ½ inch from the wire. At the short end, bend a 45 angle, and the take the long end and bend it around the tip of the round nose wires. Holding the loop with the pliers, wrap the long wire around the straight length about 3 times. After making the eye pins, crazy glue both of them into the slots.